
개발공부일지
NodeJS - Response Message class문법으로 만들기 본문
목차
1. class Response 만들기
2. startLine 역할에 맞게 구분해주기
3. status setter 만들기
4. "headers" 작업하기
5. "body" 작업하기
6. "header"와 "body" 합치기
7. send 메서드 만들기
8. sendFile과 readFile를 만들어서 활용하기
 |
 |
1. class Response 만들기
class Response {
  version = "HTTP/1.1";
  statusCode = 200;
  statusMessage = "OK";

  constructor() {}

  end() {
    const startLine = `${this.version} ${this.statusCode} ${this.statusMessage}`;
    console.log(startLine);
    return startLine;
  }
}

const res = new Response();
console.log(res);
res.end();
- startLine HTTP/1.1 200 OK 을 스트링 반환해주는 메서드로 end()를 만들고 디폴트로 멤버변수에 값을 넣어준다.
2. startLine 역할에 맞게 구분하고 설정해주기
  convertToHttpStartLine() {
    return `${this.version} ${this.statusCode} ${this.statusMessage}`;
  }

  end() {
    const startLine = this.convertToHttpStartLine();
    console.log(startLine);
    return startLine;
  }
- startLine을 새로 만들어서 바꿔준다.
- 하지만, 상태라는것은 바뀔수 있기 때문에 추가작업을 해주어야한다.
(200뿐만아니라 404, 500 등 나올수있기때문에)
const STATUS_MESSAGE = {
  200: "OK",
  404: "NOT FOUND",
};
convertToHttpStartLine() {
return `${this.version} ${this.statusCode} ${
STATUS_MESSAGE[this.statusCode]
}`;
}- 상태 코드를 따로 상수로 만들어서 관리해서 사용하고, 멤버변수로는 statusCode =200 만 남겨둔다.
3. status setter 만들기
setStatus(_code) {
    this.statusCode = _code;
    return this;
}
convertToHttpStartLine() {
const statusCode = this.statusCode || 200;
// let statusCode;
// if (this.statusCode === undefined) {
// statusCode = 200;
// } else {
// statusCode = this.setStatus;
// }
return `${this.version} ${statusCode} ${STATUS_MESSAGE[statusCode]}`;
} end() {
// HTTP/1.1 200 OK
const startLine = this.convertToHttpStartLine();
console.log(startLine);
this.statusCode = null;
return startLine;
}
res.end();
res.setStatus(404).end();
res.end();- 상태코드 200을 가장 많이 사용하니까 디폴트로 지정해준 다음 멤버변수 statusCode 값을 지워준다.
- 그리고 end를 사용했다면 statusCode를 null로 초기화해준다.
- res.setStatus(404).end() → HTTP/1.1 404 NOT FOUND 라고 뜨게된다. → 메서드체이닝
- res.end() → HTTP/1.1 200 OK 라고 뜨게된다.
4. "headers" 작업하기
class Response {
headers = {};
setHeaders(key, value) {
this.headers[key] = value;
}
}
const res = new Response();
res.setHeaders("Connection", "Close");
res.setHeaders("Content-Type", "text/html");
res.setHeaders("Content-Length", 30);
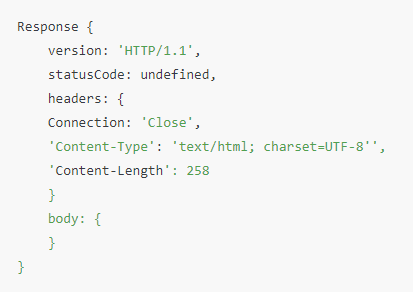
console.log(res);- 멤버변수에 headers = {} 속성을 추가한 다음 headrer의 setter를 만들어준다.

convertToHttpHeaders() {
    const headers = [];
    for (const key in this.headers) {
      const message = `${key}: ${this.headers[key]}`;
      headers.push(message);
    }
    return headers.join("\r\n");
  }
end() {
const startLine = this.convertToHttpStartLine();
const headers = this.convertToHttpHeaders();
// console.log(startLine);
this.statusCode = null;
const message = [startLine, "\r\n", headers].join("");
console.log(message);
return message;
}- header내용을 가지고 배열로 만든다음 end()로 스트링으로 바꿔준다.

constructor() {
    this.headers["Connection"] = "Close";
    this.headers["Content-Type"] = "text/html; charset=UTF-8";
  }
- 클래스 생성자함수에 header 디폴트값을 지정해준다.
- Content-Length는 지금현재 body의 byte를 알수없기때문에 body가 정해진 다음에 설정하기로한다.

5. "body" 작업하기
class Response {
body;
setBody(_body) {
this.body = _body;
const bodyBuffer = Buffer.from(_body);
const contentLength = bodyBuffer.length;
this.setHeaders("Content-Length", contentLength);
return this;
}
}
const res = new Response();
res.setBody("hello world!");
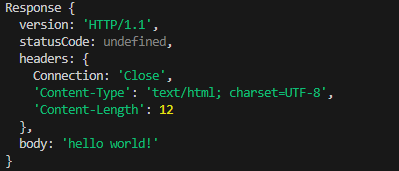
console.log(res);- body가 채워졌을때 header에 Content-Length 값이 채워지게 body buffer를 구하고 body의 byte를 구해준다.
6. "header"와 "body" 합치기
end() {
    const startLine = this.convertToHttpStartLine();
    const headers = this.convertToHttpHeaders();
    // console.log(startLine);
    this.statusCode = null;
    const message = [startLine, "\r\n", headers, "\r\n\r\n", this.body].join(
      ""
    );
    console.log(message);
    return message;
  }

res.setHeaders("Set-Cookies", "token=1234;").setBody("확인해보기").end();
- message에 body를 추가해준다.
- res.setHeaders와 setBody에 내용을 넣어서 확인해본다.

7. send 메서드 만들기
send(data){

    if(!data) throw new Error("Data 내용이 비어있습니다.")
    this.setBody(data)
    this.end()
}

  res.send("hello world! test");
8. sendFile과 readFile를 만들어서 활용하기
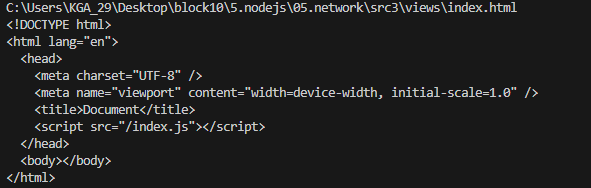
- views라는 디렉토리를 만들고 그안에 index.html를 넣어준다.
const fs = require("fs");
const path = require("path");

 readFile(filename, filepath) {
    const target = path.join(__dirname, filepath, filename);
    console.log(target);
    const data = fs.readFileSync(target);
    console.log(data.toString());
  }

res.readFile("index.html", "views");
- C:\Users\KGA_29\Desktop\block10\5.nodejs\05.network\src3\views\index.html
- <Buffer 3c 21 44 4f 43 54 59 50 45 20 68 74 6d 6c 3e 0d 0a 3c 68 74 6d 6c 20 6c 61 6e 67 3d 22 65 6e 22 3e 0d 0a 20 20 3c 68 65 61 64 3e 0d 0a 20 20 20 20 3c ... 208 more bytes>
sendFile(filename) {
    // const defaultPath="views"
    const body = this.readFile(filename, "views");
    this.send(body);
  }

res.sendFile("index.html");
- 파일을 읽어서 body 내용을 담아서 내보낸다.

※ 완성본
const fs = require("fs");
const path = require("path");

const STATUS_MESSAGE = {
  200: "OK",
  404: "NOT FOUND",
};

class Response {
  version = "HTTP/1.1";
  statusCode;
  headers = {};
  body;

  constructor() {
    this.headers["Connection"] = "Close";
    this.headers["Content-Type"] = "text/html; charset=UTF-8";
  }

  setBody(_body) {
    this.body = _body;

    const bodyBuffer = Buffer.from(_body);
    const contentLength = bodyBuffer.length;
    this.setHeaders("Content-Length", contentLength);
    return this;
  }

  setStatus(_code) {
    this.statusCode = _code;
    return this;
  }

  setHeaders(key, value) {
    this.headers[key] = value;
    return this;
  }

  convertToHttpStartLine() {
    const statusCode = this.statusCode || 200;
    return `${this.version} ${statusCode} ${STATUS_MESSAGE[statusCode]}`;
  }

  convertToHttpHeaders() {
    const headers = [];
    for (const key in this.headers) {
      const message = `${key}: ${this.headers[key]}`;
      headers.push(message);
    }
    return headers.join("\r\n");
  }

  readFile(filename, filepath) {
    const target = path.join(__dirname, filepath, filename);
    const data = fs.readFileSync(target);
    return data.toString();
  }

  sendFile(filename) {
    const body = this.readFile(filename, "views");
    this.send(body);
  }

  send(data) {
    if (!data) throw new Error("Data 내용이 비어있습니다.");
    this.setBody(data);
    this.end();
  }

  end() {
    // HTTP/1.1 200 OK
    const startLine = this.convertToHttpStartLine();
    const headers = this.convertToHttpHeaders();
    this.statusCode = null;

    const message = [startLine, "\r\n", headers, "\r\n\r\n", this.body].join("");
    console.log(message);
    return message;
  }
}

const res = new Response(); // {...}

res.sendFile("index.html");
※ 하나의 메서드에 하나의 기능만 넣을수있도록 쪼개기!
※ send : 매개변수에 있는 내용을 그대로 body에 담아서 보내는것
※ sendFile : 특정파일에 있는 내용을 버퍼로 읽은 다음에 그내용을 바디로 만들어서 보내는것
※ 좀더 공부해서 send, sendFile, readFile 메서드를 class로 빼서 작업해보기!!!!
'NodeJS' 카테고리의 다른 글
| NodeJS - RESTful, URL, URI, Request method (GET, POST) (0) | 2023.09.11 |
|---|---|
| NodeJS - 요청, 응답 (0) | 2023.09.09 |
| NodeJS - net 모듈을 사용해서 TCP 구현 (0) | 2023.08.31 |
| NodeJS - network, OSI 7계층, host, 프로토콜, port (0) | 2023.08.30 |
| NodeJS - 진수 / Buffer(내장모듈) / writeStream (0) | 2023.08.29 |

